
This is part two of Google Maps integration series. Read part one here.
Google has a history of providing tools for free to prove the worth of their products, and you can do a lot with Google Maps inside FileMaker without paying a dime, but at some point, you will probably need more. If you do, don’t worry, the enhanced tools are very affordable, and you can try them out for free. Best of all, you only pay for what you use. In this blog, I’ll show you how to set up access to the tools available through the Google Maps API.
How do I access the tools?
As I mentioned in part 1 of this blog, the free tools available from Google Maps are accessible by URL. The paid tools are accessible via an API you can interact with using the Insert from URL script step in FileMaker which will return results to you formatted as JSON. The free tools can be used anonymously through a URL, but accessing the API requires you to register for an account.
What’s in the toolbox?
Google breaks down the tools available in the Maps Platform into three broad categories: Routes, Places, and Maps.
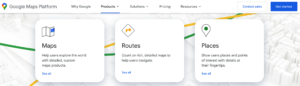
- Routes – Provides turn-by-turn directions that can include real-time traffic information.
- Compute Routes – Directions with real-time traffic between multiple locations
- Compute Routes Matrix – Travel times and distances for multiple destinations
- Directions – Directions for transit, biking, driving, or walking between multiple locations.
- Distance Matrix – Travel times and distances for multiple destinations.
- Roads – Determine the route a vehicle travels.
- Places – Gives you access to information about a specific place such as its address, latitude, longitude, time zone, or details about what is located there.
- Address Validation – Validate an address, standardize it for mailing, and determine the best geocode.
- Autocomplete – Automatically suggest businesses and points of interest as a user types.
- Current Place – Discover the place at a device’s currently-reported location.
- Geocoding – Convert addresses to geographic coordinates or the reverse.
- Geolocation – Return the location of a device without relying on GPS.
- Place Details – Add details for millions of places.
- Place Photos – Access place-related photos stored in Google’s Places database.
- Place Search – Return a list of places based on the user’s location, text query, phone number, or search string.
- Time Zone – Get the time zone for a specific latitude and longitude coordinate.
- Maps – Returns customizable static or dynamic maps as well as street views.
- Aerial View – Pre-rendered, 3D cinematic video of points of interest.
- Dynamic Maps – interactive maps using Cloud-based maps styling.
- Dynamic Street View – real-world imagery with 360° panoramas.
- Elevation – query locations on the earth for elevation data.
- Maps Datasets – Upload, store, and manage geospatial data to the Google Cloud console.
- Maps Embed – Add an interactive map or Street View panorama to your site.
- Static Maps – Return simple map images.
- Static Street View – Return a static Street View panorama or thumbnail.
For more information on each of these tools, you can check out the Maps Platform products page here: https://mapsplatform.google.com/maps-products/
How much does it cost?
How much you pay for Google Maps depends on which tools you use and how much you use them. Each tool listed in the previous section represents a distinct API and is managed separately within the Google API admin console linked to your account. Each API is priced differently, with the cost to access a given API 1,000 times in a month ranging from $2 to $30. The prices also follow a sliding scale, with discounts for greater levels of usage.
Google provides every account with a $200 credit each month, and you won’t be charged anything until you go over that amount. That allows for a substantial amount of testing, but make sure you monitor your usage in the Google console so you don’t lose track or you may end up with an unexpected bill.
https://mapsplatform.google.com/pricing/
It’s important to note that the cost of using an API is not always based on how many times you call it. In some cases, it is based on the number of “elements” that you send to the API. Let me explain what that means:
Some APIs, like Geocoding, take a single location and return a single result. These are charged on a per-request basis. In the case of Geocoding, you pay $.005 per request for the first 100,000 requests.
https://developers.google.com/maps/documentation/geocoding/usage-and-billing
Other APIs, like the Distance Matrix, allow you to submit multiple sets of origin and destination locations in a single request and receive results for each combination of origin and destination. Google refers to each origin/destination combination as an element and charges you based on the number of unique elements that can be created from your request. So, if you send a request with three origins and three destinations, the API will return, and charge you for, nine results.
Pricing for the Distance Matrix also changes based on the parameters that you send in your request. If you add a parameter, such as departure_time, that triggers the use of Google’s traffic model, the price will increase to $.01 per element. Make sure you research the costs of the various APIs thoroughly.
https://developers.google.com/maps/documentation/distance-matrix/usage-and-billing
Each API in the Google Maps Platform has a Usage and Billing page within its documentation so you can figure out exact costs, but there is no substitute for a real-world test. Before you go into production, do a test run and then log into the Google Maps console to check the metrics for each API and make sure that your usage comes out as expected.
https://console.cloud.google.com/google/maps-apis/
How do I get set up?
Getting set up to access the Google Maps platform requires several steps, but if you’ve used any Google services in the past you may already have some of them completed. If so, some instructions below may not apply to you.
You’ll need to make sure you’ve accomplished the following tasks before you can access the Maps Platform:
- Create a Google account.
- Enable access to the Maps Platform from your Google account.
- Set up a billing account and payment method.
- Create an API Key that can be used to access the Maps Platform APIs.
- Set up restrictions to prevent unauthorized usage of the API Key.
Sign Up for a Google Maps Platform Account
- Open your web browser and go to the Google Maps Platform website: https://mapsplatform.google.com/.
- Click on the Get started button.
- If you are already signed in to a Google account in your browser, you’ll be asked to accept the Google Cloud terms of service, if not, you’ll be asked to create a Google account.
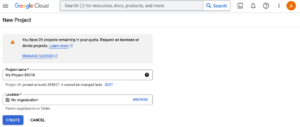
 Create a New Project
- If you have never set up a Google Cloud project before you will be asked to create one automatically, otherwise you can type “create a project” in the Search box at the top middle of the screen.

- Enter a name for your project.
- Click the CREATE button.
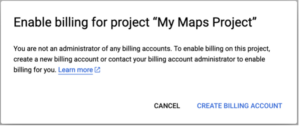
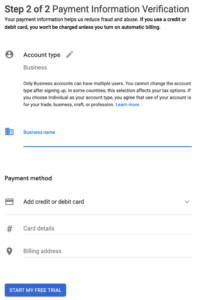
Set up a Billing Account
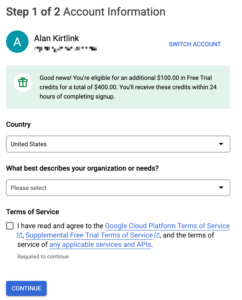
- If you don’t already have a billing account associated with this Google account, you will be asked to create one and enter a method of payment.
- Be sure to put restrictions in place later in the setup process to protect against unauthorized use.
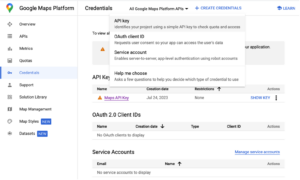
Create an API Key
Once you’ve entered your billing information, you will be asked to generate an API Key which will be used to control access to the various APIs within the Maps Platform. You can restrict which APIs can be accessed by a particular key, but for simplicity, we’ll start by allowing all APIs to be accessed through a single key.
Take note of the API Key and keep it handy, as it will be needed to access the APIs used in the examples.

If you aren’t automatically asked to generate a key, you can create one manually by clicking on Credentials in the left-hand navigation pane and then clicking Create Credentials and selecting API Key.
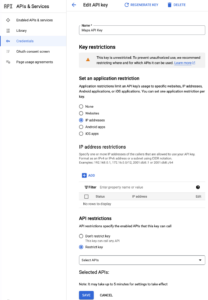
Set up restrictions on the API Key
Once you have the API Key set up, it is highly recommended that you put restrictions in place to prevent unauthorized use. For instance, you may want to limit access to your FileMaker Server’s IP address and then have all your requests run from the server using perform script on server. This is an optional step but since unauthorized use could result in a huge charge being sent to your credit card it is worth the extra time to set it up.
Setup complete
Let’s take a moment and appreciate how much work it was to get everything set up. Pat yourself on the back, you deserve it. All this setup can be a bit of a barrier to usage, but now that you have it completed, you are ready to start integrating the Google Maps API with your database.
Come back for part three of this series, where I’ll show you how to make calls from your database to the various endpoints within Google Maps.

Built with you in mind
Speak to one of our expert consultants about making sense of your data today. During
this free consultation, we'll address your questions, learn more about your business, and
make some immediate recommendations.