
Stripe is a very popular payment processing system that combines the features of a merchant account, a payment processor, and a payment gateway in a single unified payment platform that (by design) is very developer friendly. The Stripe API is well documented and very easy to understand. This means that as a Claris developer, the sky’s the limit when it comes to controlling almost all aspects of a Stripe system, right from the confines of a custom Claris FileMaker solution.
In this post, we’ll dive into a simple integration with Stripe. For an idea of what the finished product looks like, take a look at this short video:
Configuring Stripe for API Access
Every Stripe account is ready for integration with a few quick steps. Log into your Stripe account and click the Developers button to access your developer dashboard. In the API keys area, you’ll see your Standard Keys already configured. These are test keys that allow you to setup your application in a safe testing environment without fear of modifying your production data or processing real payments. Reveal your test key and copy it to your clipboard, we will use it in the next step.
The Anatomy of a Stripe API Request
Each API request contains an endpoint (a URL) and a chunk of data (the cURL options). You’ll authenticate each request to the Stripe API with your secret key from your Stripe account. A successful request will return a JSON object relevant to the request. For example, if we’d like to retrieve some customer information from Stripe, we’ll need the unique Stripe id for that customer and we can put together a request like this:
URL:
https://api.stripe.com/v1/customers/cus_N6rTDjOOtSA75u
cURL options: -u sk_test_51MKPLlDm4..ReallyLongString..p00xAdf8yvR --request GETThe URL is the base URL (api.stripe.com/v1 – identical for all requests), the /customer endpoint, and the customer id. Our cURL options include our API key and a –request flag indicating this is a GET request. We assemble these components and execute this request from FileMaker using the Insert from URL script step: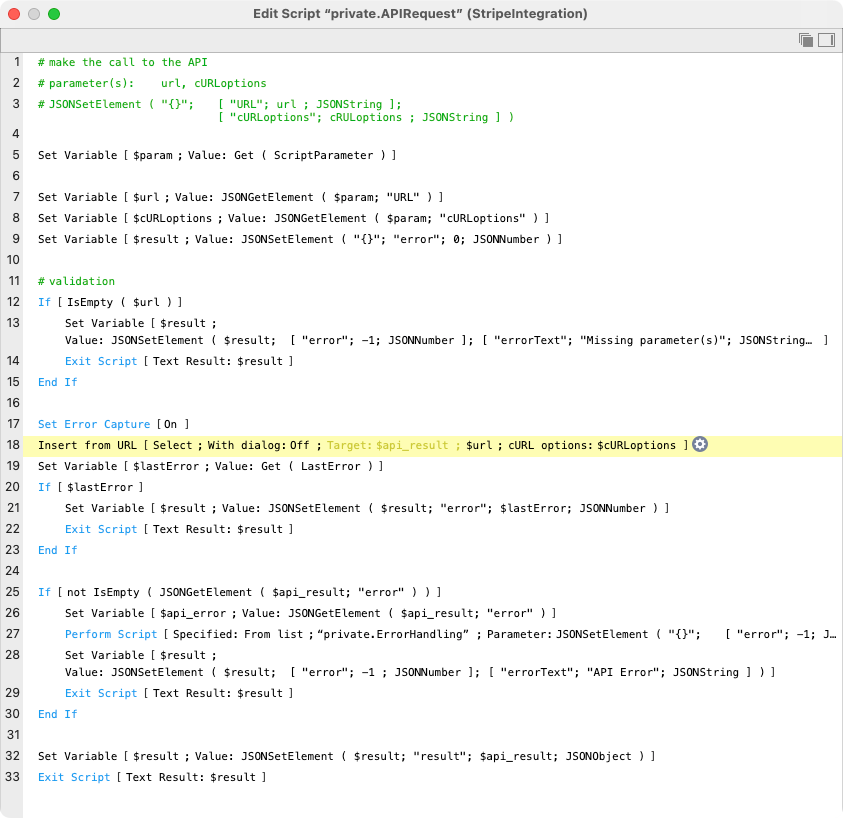
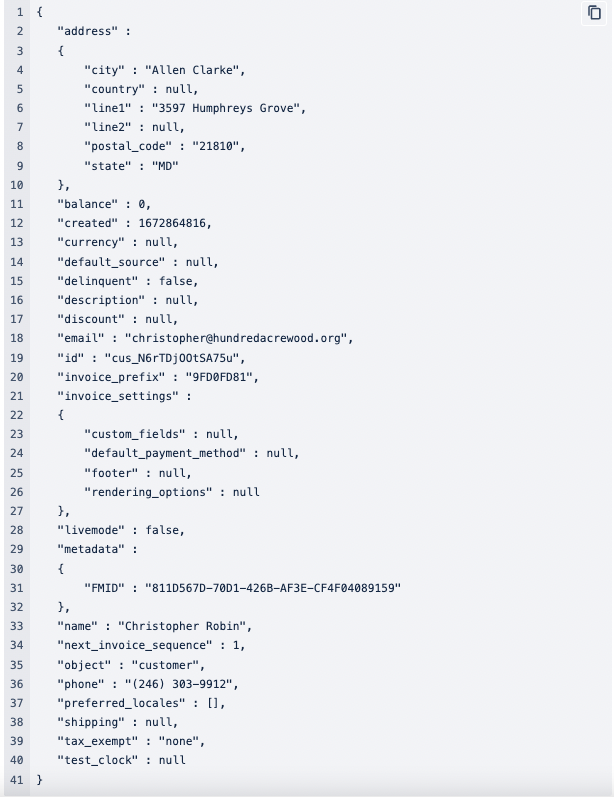
If our request is successful, we’ll get a response from the API in the form of a JSON object like the following:
That’s really all there is to it! The rest is just reading through the Stripe API documentation, looking for the endpoint we’re interested in, formatting a request properly, and parsing the JSON response.
Creating a Customer
If we’ve got a customer record in our Claris FileMaker application and we need to create a corresponding customer record in Stripe, we’ll be using the same customers endpoint as above, but our cURL options will need to include all the customer information that we’d like to send to Stripe. The API can be picky about our request so we need to be careful in how we format the data that we’re sending. For example, Stripe doesn’t like to see spaces in our data, so if we’re sending the name of a city like “Allen Clarke”, Stripe requires that we format the city name substituting a “+” for the space. In fact, any time we need to include a space in the data that we’re sending, we need to sub out the spaces with a plus sign.
Consulting the API documentation, we find that our request needs to take the form:
URL:
https://api.stripe.com/v1/customers
cURL options:
-u sk_test_51MKPLlDm4..ReallyLongString..p00xAdf8yvR
--request POST
-d name=Christopher+Robin
-d email=christopher@hundredacrewood.org
-d phone=(246)+303-9912
-d email=christopher@hundredacrewood.org
-d address[line1]=3597+Humphreys+Grove
-d address[city]=Allen+Clarke
-d address[state]=MD
-d address[postal_code]=21810
-d metadata[FMID]=811D567D-70D1-426B-AF3E-CF4F04089159
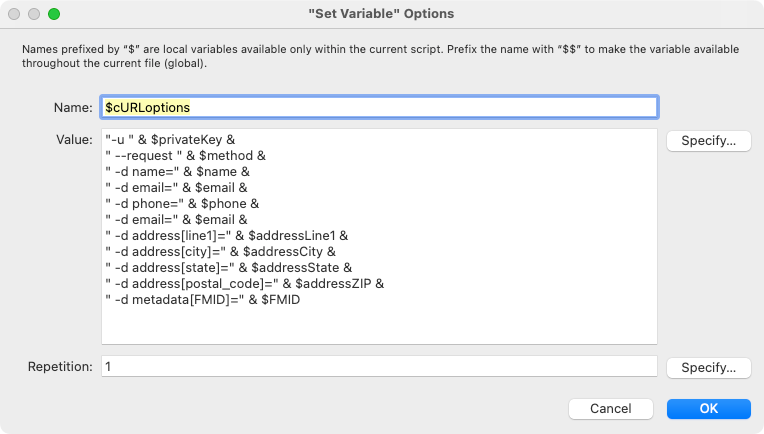
Our preference when assembling complex strings like the above cURL options is to collect the various bits of data into variables, and then assemble the individual pieces into one large string. Notice the metadata object where we are defining a custom bit of data (FMID) which is the primary key of our customer in the FileMaker customers table.
When we assemble our request and issue the Insert from URL script step, we get a JSON object that looks identical to the one we received above when we made the GET request. If we make any kind of error in our request, we’re get a very nice JSON object explaining the nature of our error and a link to some documentation on how to fix the problem:
{
    "error":
    {
        "code": "parameter_unknown",
        "doc_url": "https://stripe.com/docs/error-codes/parameter-unknown",
        "message": "Received unknown parameter: addres. Did you mean address?",
        "param": "addres",
        "request_log_url": "https://dashboard.stripe.com/test/logs/req_EGQxlwJEpbWIFN?t=1672875323",
        "type": "invalid_request_error"
    }
}
In the above example, we intentionally misspelled the word ‘addres’ and the Stripe error handling routine correctly guesses that we really mean ‘address’ – how cool is that?!
Processing a Payment
Given that the Stripe API is powerful and easy to use, the rest is all about reading the documentation and deciding which endpoints are going to be useful to our application goals. Since Stripe is all about payment processing, how about we process a payment? This is going to be a multi-step process that, in broad stroke, involves:
- creating a payment method
- creating a payment intent
- advancing the status of our payment intent
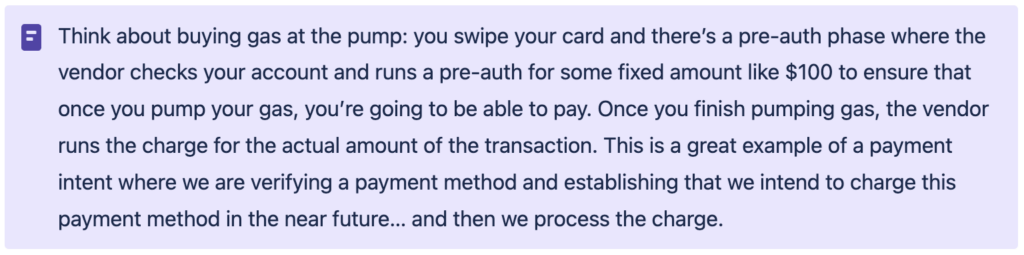
As it turns out, we can fast track this process a bit by combining steps 2 and 3, but let’s explain the terminology a bit first. A payment method is a vehicle that a customer uses to facilitate the transfer of money, typically this will be a credit card (which is what we will cover here) but could easily be an ACH bank transfer, an Apple or Google Pay transaction, or any one of nearly 30 different types of payment methods that Stripe currently supports. A payment intent is the actual payment transaction that gets stepped through a number of different statuses. Depending on the type of payment method in use, these statuses can change, but for a typical credit card transaction, there might be a pre-auth, and then an actual transaction where the payment is made.
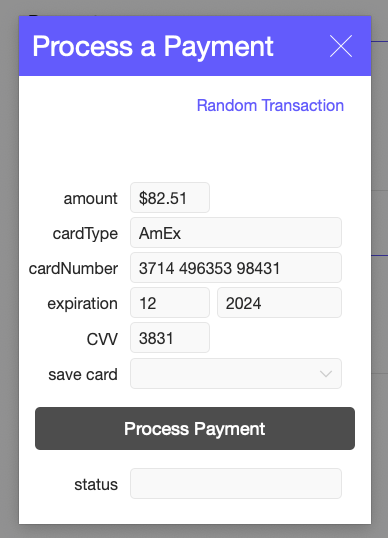
Creating the payment method is something that we can do for every transaction, or we can elect to store the payment method for future charges (vendor to customer: “shall I use your AmEx on file?”). More on that in a future blog post, for now we will create the payment method every time we need to process a charge. Let’s say we want to charge our customer $82.51 and they’re going to use their AmEx:
To create the payment method, our request will need to take the form as follows. Note that we have carefully replaced any spaces in our data with plus symbols, and we have included the name on the card and contact information for the card holder (this may be different than the customer!). Many of these parameters are optional and we’ll want to consult the API documentation for details. That said, typically the more information we can provide, the more likely it is that our charge will be verified. For example, cvc is optional, but omitting it will increase the likelihood that our charge will be denied.
URL:
https://api.stripe.com/v1/payment_methods

cURL options:
-u sk_test_51MKPLlDm4..ReallyLongString..p00xAdf8yvR
--request POST
-d type=card
-d card[number]=371449635398431
-d card[exp_month]=12
-d card[exp_year]=2024
-d card[cvc]=3831
-d billing_details[address][line1]=3597+Humphreys+Grove
-d billing_details[address][city]=Allen+Clarke
-d billing_details[address][state]=MD
-d billing_details[address][postal_code]=21810
-d billing_details=christopher@hundredacrewood.org
-d billing_details[phone]=(246)+303-9912
-d billing_details[name]=Christopher+Robin
As before, we package up these parameters and issue an Insert from URL script step, and if all goes well, we get a JSON object that includes the id of the payment method that we can use in subsequent steps. Way down at the bottom of our returned JSON object below, we see "id" : "pm_1MMgwzDm4BB4MgAo8aJ2CloK" which is the important bit of data that we will need for the next step.
{
	"billing_details" :
	{
		"address" :
		{
			"city" : "Allen Clarke",
			"country" : null,
			"line1" : "3597 Humphreys Grove",
			"line2" : null,
			"postal_code" : "21810",
			"state" : "MD"
		},
		"email" : "christopher@hundredacrewood.org",
		"name" : "Christopher Robin",
		"phone" : "(246) 303-9912"
	},
	"card" :
	{
		"brand" : "amex",
		"checks" :
		{
			"address_line1_check" : "unchecked",
			"address_postal_code_check" : "unchecked",
			"cvc_check" : "unchecked"
		},
		"country" : "US",
		"exp_month" : 12,
		"exp_year" : 2024,
		"fingerprint" : "Z1IOiIim0uFgmo1Z",
		"funding" : "credit",
		"generated_from" : null,
		"last4" : "8431",
		"networks" :
		{
			"available" : [ "amex" ],
			"preferred" : null
		},
		"three_d_secure_usage" :
		{
			"supported" : true
		},
		"wallet" : null
	},
	"created" : 1672877093,
	"customer" : null,
	"id" : "pm_1MMgwzDm4BB4MgAo8aJ2CloK",
	"livemode" : false,
	"metadata" : {},
	"object" : "payment_method",
	"type" : "card"
}
The next step is to create (and process) the payment intent. We are using the payment_intents endpoint, this is a POST request, and we need to include some important bits of information for our payment intent. Note that the amount of the payment is expressed in cents (this is dictated by our currency which is usd in this case – different currencies have different rules, but in all cases, the amount will be an integer). We also include the Stripe customer id and the payment_method captured above. Lastly, we specify that confirm=true, this will fast track our payment_intent and process the payment immediately.
URL:
https://api.stripe.com/v1/payment_intents

cURL options:
-u sk_test_51MKPLlDm4..ReallyLongString..p00xAdf8yvR
--request POST
-d amount=8251
-d confirm=true
-d customer=cus_N6udHowJfs2Jwk
-d description=
-d payment_method=pm_1MMgwzDm4BB4MgAo8aJ2CloK
-d currency=usd
-d receipt_email=christopher@hundredacrewood.org
If our request is successful, we receive a JSON object with all the details of our payment intent. We can do what we want with this data with FileMaker’s JSON parsing functions.
{
"amount" : 8251,
"amount_capturable" : 0,
"amount_details" :
{
"tip" : {}
},
"amount_received" : 8251,
"application" : null,
"application_fee_amount" : null,
"automatic_payment_methods" : null,
"canceled_at" : null,
"cancellation_reason" : null,
"capture_method" : "automatic",
"client_secret" : "pi_3MMh69Dm4BB4MgAo0mRy5cR7_secret_wykAT7gvNA8dxRAIO2HniGn7g",
"confirmation_method" : "automatic",
"created" : 1672877661,
"currency" : "usd",
"customer" : "cus_N6udHowJfs2Jwk",
"description" : null,
"id" : "pi_3MMh69Dm4BB4MgAo0mRy5cR7",
"invoice" : null,
"last_payment_error" : null,
"latest_charge" : "ch_3MMh69Dm4BB4MgAo0gewosdl",
"livemode" : false,
"metadata" : {},
"next_action" : null,
"object" : "payment_intent",
"on_behalf_of" : null,
"payment_method" : "pm_1MMgwzDm4BB4MgAo8aJ2CloK",
"payment_method_options" :
{
"card" :
{
"installments" : null,
"mandate_options" : null,
"network" : null,
"request_three_d_secure" : "automatic"
}
},
"payment_method_types" : [ "card" ],
"processing" : null,
"receipt_email" : "christopher@hundredacrewood.org",
"review" : null,
"setup_future_usage" : null,
"shipping" : null,
"source" : null,
"statement_descriptor" : null,
"statement_descriptor_suffix" : null,
"status" : "succeeded",
"transfer_data" : null,
"transfer_group" : null
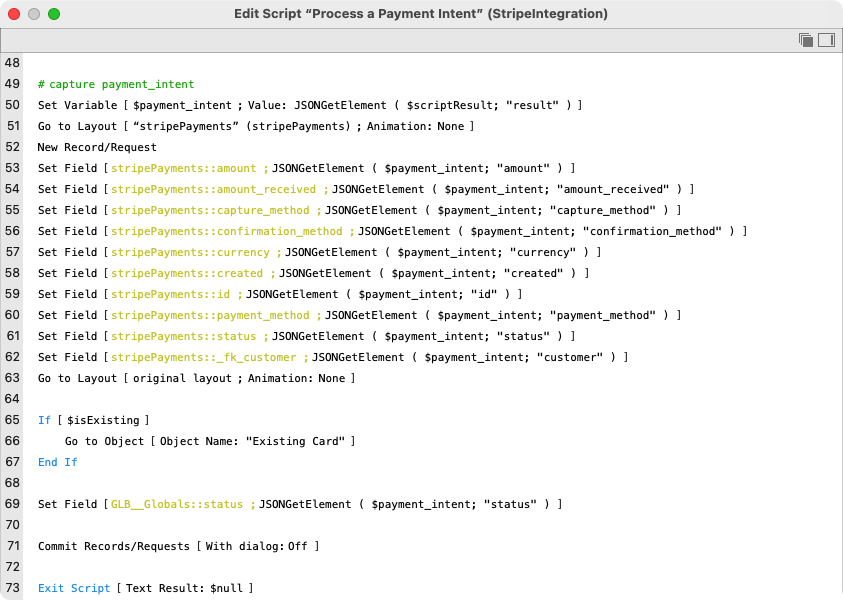
}In our demo file, we are capturing a handful of these values into a new stripePayments record as shown in this snippet of our payment processing script:
Other Useful Stripe Functions
Creating customers and processing payments may be all that we need for a basic Stripe/Claris FileMaker Integration. Without too much additional work, we could add things like updating a Stripe customer, storing a payment method, or refunding a purchase, but even this is just scratching the surface with what can be accomplished with a more full featured integration. Just take a quick look at the Stripe API documentation and you’ll immediately start thinking of all sorts of cool things that you can do with your custom Claris FileMaker solution.
What kinds of ideas do you have? Let us know!
Comments
Leave a comment

Built with you in mind
Speak to one of our expert consultants about making sense of your data today. During
this free consultation, we'll address your questions, learn more about your business, and
make some immediate recommendations.
Tanya, please reach out to charlie.bailey@codence.com.
Hi there, you comment that there is a demo file for the Stripe payment link API.
Could you PLEASE sent this to me?
I would really appreciate it.