
This post will walk you through the process of using JotForm to submit data directly to FileMaker. If you’ve ever needed a simple solution for getting data from a website, JotForm is a nice option that’s free, doesn’t require complicated authorization, and keeps the process simple. You only need to use the Insert from URL script step and some straightforward JSON parsing to make it work.
Who is this for?
If you’re already a JSON Jedi or are adept at API calls and have a solid understanding of these concepts, then this article may not be for you. However, if you are new to FileMaker, have limited knowledge when it comes to API calls, cURL, or even JSON formatting and parsing, then hopefully you will find this article useful.
Why did I write this?
Before we get started, I would first like to briefly explain why I chose to write this article. Personally, as a full-stack Web and FileMaker developer, I am an advocate for modular app design and integration. I see a growing need for FileMaker developers to specialize in integration, especially if such integration helps to address a particular use case or problem, that FileMaker may not particularly specialize in.
One such instance, is the frequent disparity between information collected online and information stored in a FileMaker solution. Examples would include website orders, online registrations, or contact requests. Trying to keep such information in-sync can prove challenging. (Though with Claris Connect on the horizon, I suspect that will change!)
While ODBC, JDBC, and WebDirect are all great in their own right, each has certain limitations and challenges. WebDirect in particular couldn’t be easier to implement. However, using WebDirect for a simple embedded contact form on a company website for example wouldn’t be tenable because you’d either need concurrent licenses for all visitors, or authenticated accounts. In addition, such use of WebDirect will unfortunately seldom look or function like other responsive forms that are commonplace today.
FileMaker is fantastic, and we use it as our primary tool for solving the needs of our clients daily. That being said, there is a good argument to be made for integrating FileMaker with other software tools, particularly if such integration elevates the end result.
There has been an undeniable industry shift towards more singular, specialized apps that perhaps only do one thing, but they do that one thing really well. App services like PayPal, Dropbox, and Slack are popular examples of this. Think of it like a kind of Darwinian “species diversity” of software, which promotes and encourages the collaboration and sharing between apps and other web-based services by only competing against other apps that directly share their same focus or niche.
There has been an increased departure from the “one app to rule them all” mentality in the software industry. Closed proprietary software that dominated the market for years are giving way to newer more collaborative apps. Apps that actively promote and encourage the exchange of data and app integration.
Seeing this trend, Claris has made a clear and continued effort to include better integration standards in their products. Integration features like the FileMaker Data API, ODBC, JDBC, XML, cURL, and JSON to name a few. These additions help to elevate the FileMaker Platform and keep it current within this ever-changing industry.
Why JotForm?
I’ll start out by noting that JotForm is one of many online form building services. JotForm allows users to create custom online forms that can be easily embedded on any website. In addition, these forms are automatically responsive for use on large and small screens alike. We chose JotForm mainly because it offers a wide range of form options, but we’re not necessarily endorsing JotForm over other options. GravityForms, for example, is a widely used paid alternative with which we work all the time.
JotForm offers features like accepting online payments, custom CSS styling, conditional logic, and easy form creation, to name a few. We decided to go with JotForm in this example because it can be used for free (which should help you in your exploration of the topic), and their API calls do not require any sort of complex authorization to make them work. Authorization is often one of the most difficult hurdles when working with any particular integration puzzle.
As you may know, an API (Application Program Interface) is basically a pre-determined set of instructions and rules that allow two technologies to interact. These instructions allow developers to integrate software or a web service (like JotForm) with another app of their choosing. Like a border checkpoint, some APIs make this process ridiculously easy, while others make it seem like you’re trying to cross into a war-torn country.
Make the Call
Now that we have covered the what and the whys, let’s now dive into the how. Here is a walk-through on the process of making an easy API call to JotForm using FileMaker.
- If you haven’t already, go to https://www.jotform.com/ and create a free account.
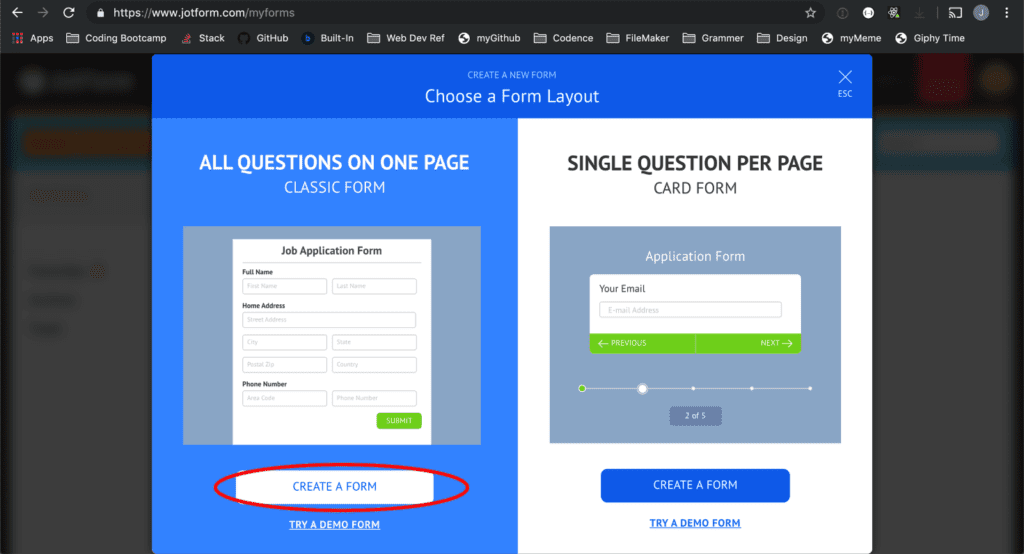
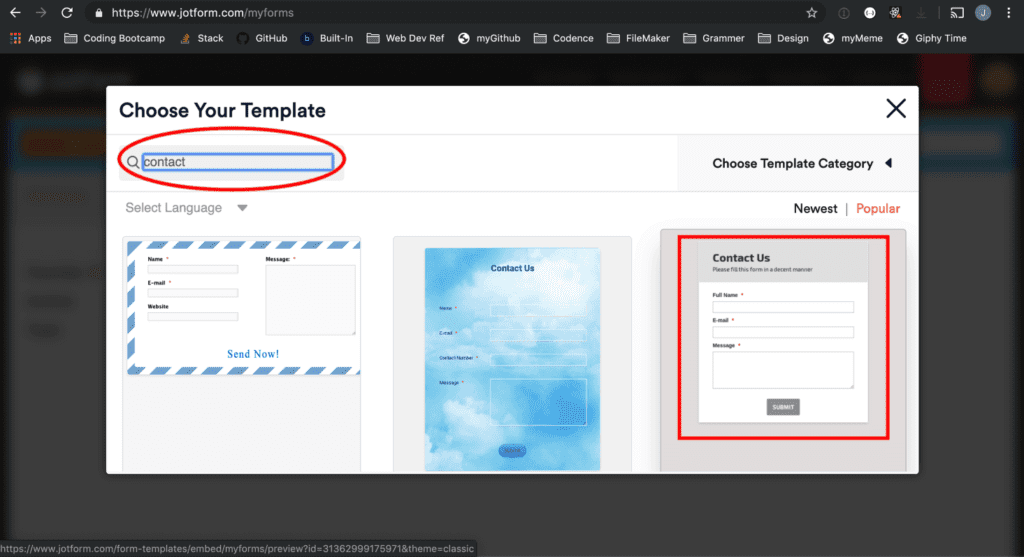
- Once logged into JotForm, create a form of your choosing. We decided to use a simple “Contact” form template. However feel free to find a template (or build your own form from scratch) to fit your specific needs.
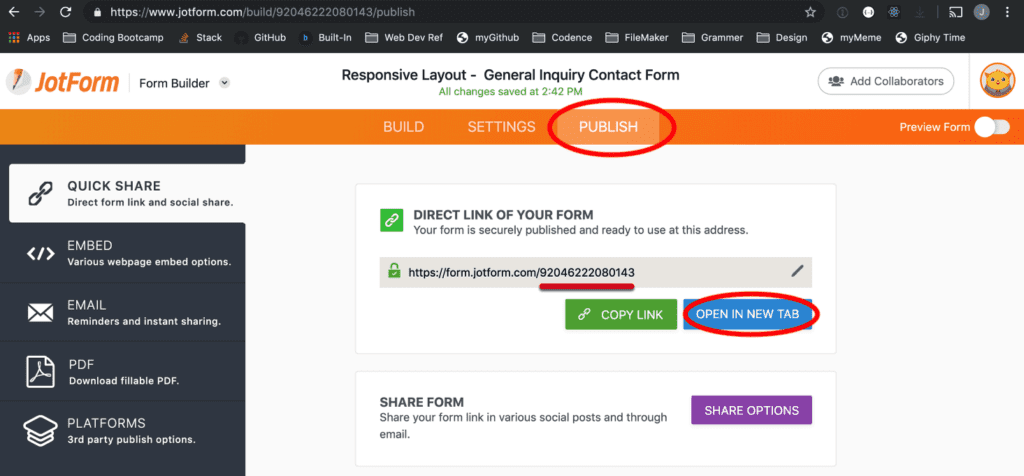
- Under the “Publish” tab, copy your new formID (the long number value at the end of your form URL). Then open the form in a new tab and submit a sample entry or two.
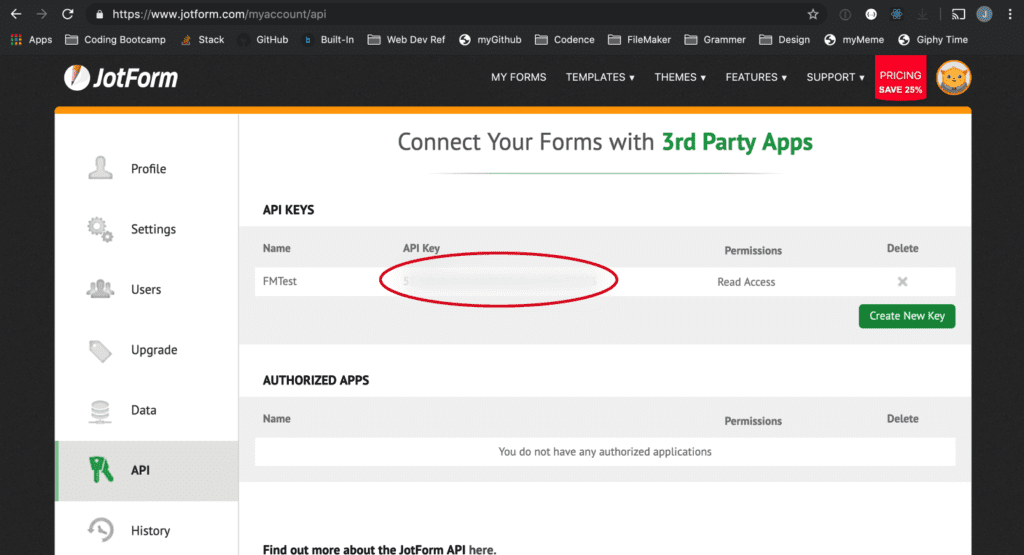
- Now go to https://www.jotform.com/myaccount/api and generate an API key for your account. With the formID and API key in hand, we are now well on our way to start making API calls.
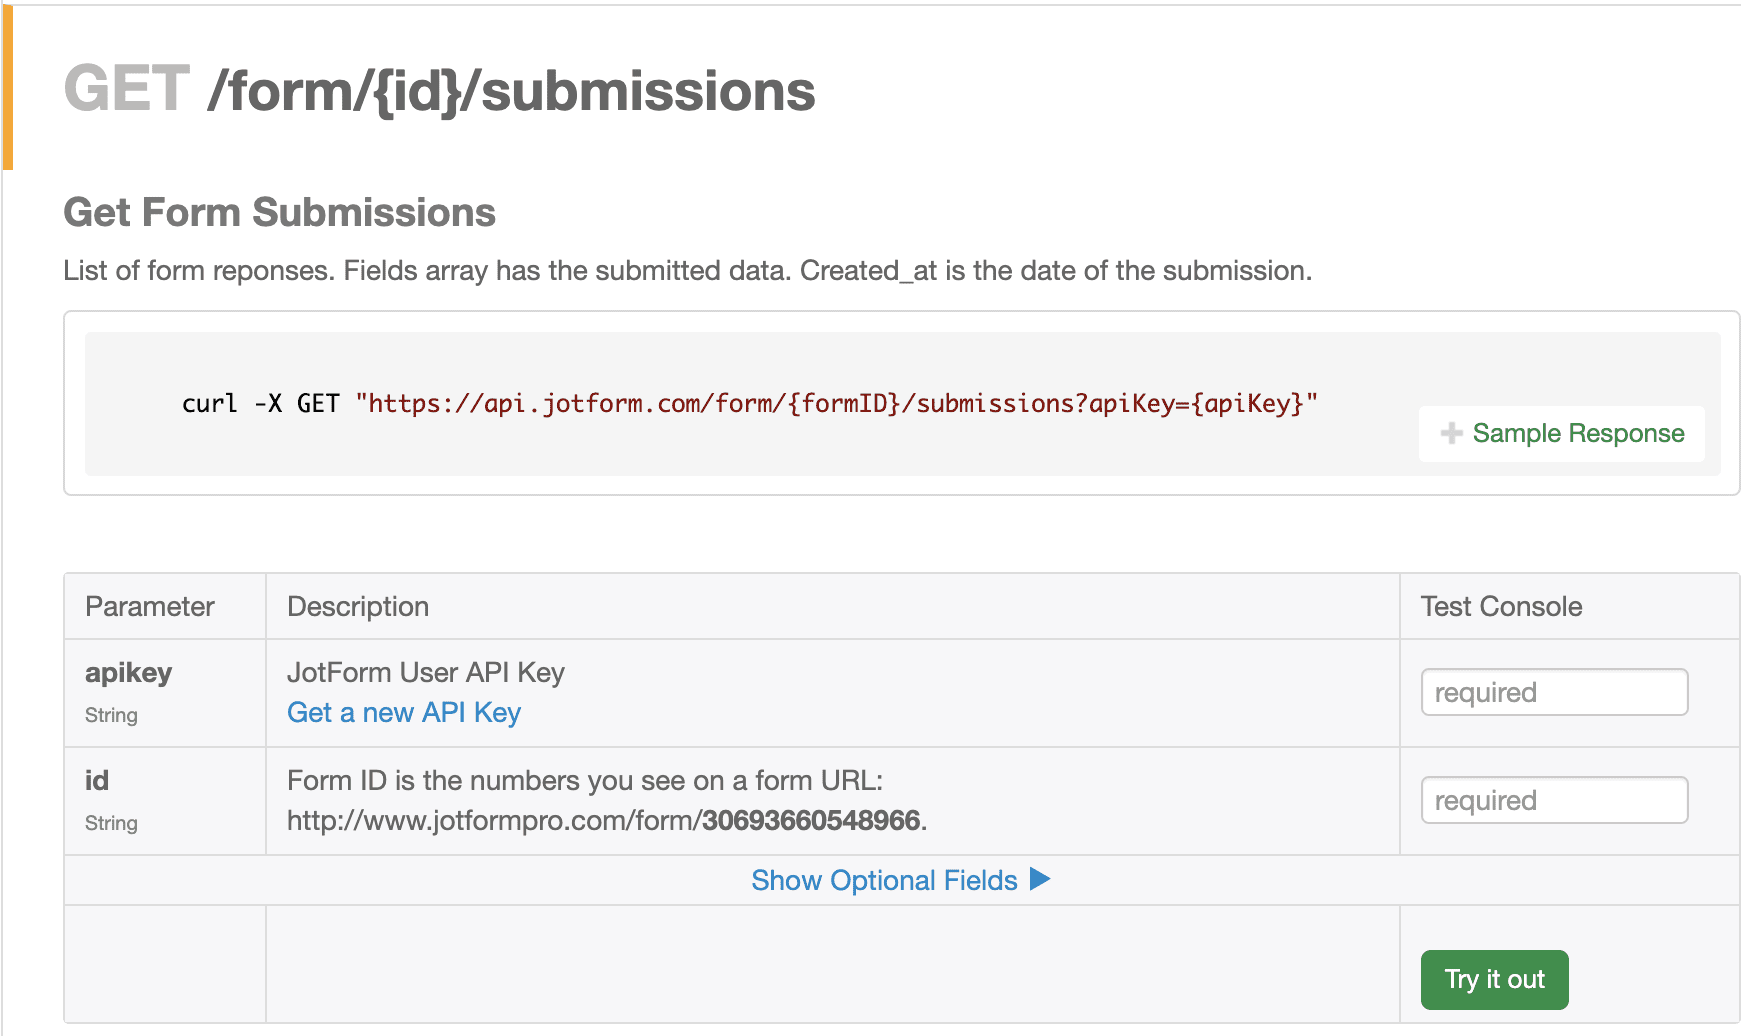
- While authentication is often the most difficult hurdle when working with APIs, understanding the documentation is usually a close second. Thankfully JotForm’s API documentation is very well organized and provides excellent examples. Essentially we want to get all of the entries for our newly created JotForm. We can easily find the API call we are looking for here: https://api.jotform.com/docs/#form-id-submissions. In this particular API call, JotForm tells us that there are two required call parameters: id and apikey.
- Having everything we need to make our API call, we now can continue in FileMaker. In our desired FileMaker file (either a pre-existing one or one you built from scratch) do the following:
- Add a new global text field for temporarily storing your API results. In our example we simply named it “g_apiResult”. (TIP: Unsure how to create a field? See: Defining and changing Fields and Defining Global Fields in the FileMaker help guide).
- Create a new script for your API call. Within it, use the “Insert from URL” script step to accept the following conditions:
- Target: (your newly defined global field)
- Specify URL: https://api.jotform.com/form/{formID}/submissions?apiKey={apiKey} Simply replace the values in curly { } brackets with your specific formID and apiKey respectively.
- Specify cURL options: “-X”
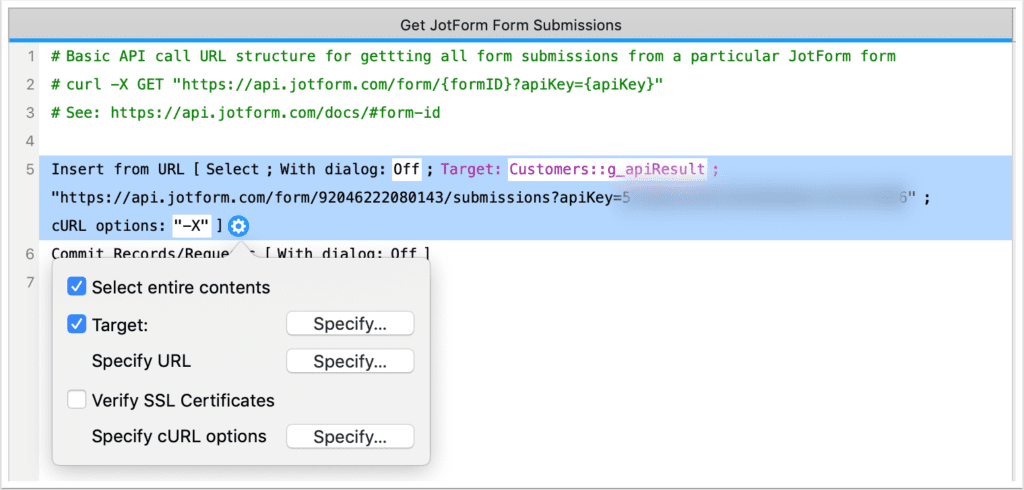
- Now save and run your new script and you should see something like this as your API result.

Congratulations, you have just made a successful API call to JotForm and saved the results into FileMaker! Now we just have to parse the JSON results so that you can actually do something with this new data.
Parse the Data
Ok so now that we have this jumble of text, what do we do with it? Well, making a successful API call is fantastic but processing the results so we can actually use them is the next step. This is where the JSON functions in FileMaker really come in handy.
What is JSON? Simply put it stands for JavaScript Object Notation. Now don’t worry, you do not need to know anything about JavaScript to understand JSON. Basically, JSON is really nothing more than a lightweight open standard for storing and transferring structured chunks of data, (where you know what information belongs in which fields), and it is intended to be easy to read and understand by both humans and machines alike.
Not feeling like your JSON result is very legible? Not a problem. The JSONFormatElement script step in FileMaker will add some nice indentations and white space to your JSON result making it much more human friendly. Notice the legibility improvement in the example below:
One of the things that makes JSON so powerful (and popular) is the way in which people or machines can easily zero in to the values they want. Rather than having to do some sort of looping or complex text calculations to parse information, the JSON structure acts like x & y coordinates on a map, allowing you to zoom in to what you need both precisely and quickly.
How does this work? Let’s learn by example.
JSON is essentially comprised of one or more JSON “objects” enclosed in curly “{ }” brackets. Often times a JSON object can contain several CHILD objects nested within another like shown in the example above.
Each JSON object contains one or more name & value pairs separated by a colon “:”, for example:
{ “I’m a name”: “I’m a value” }
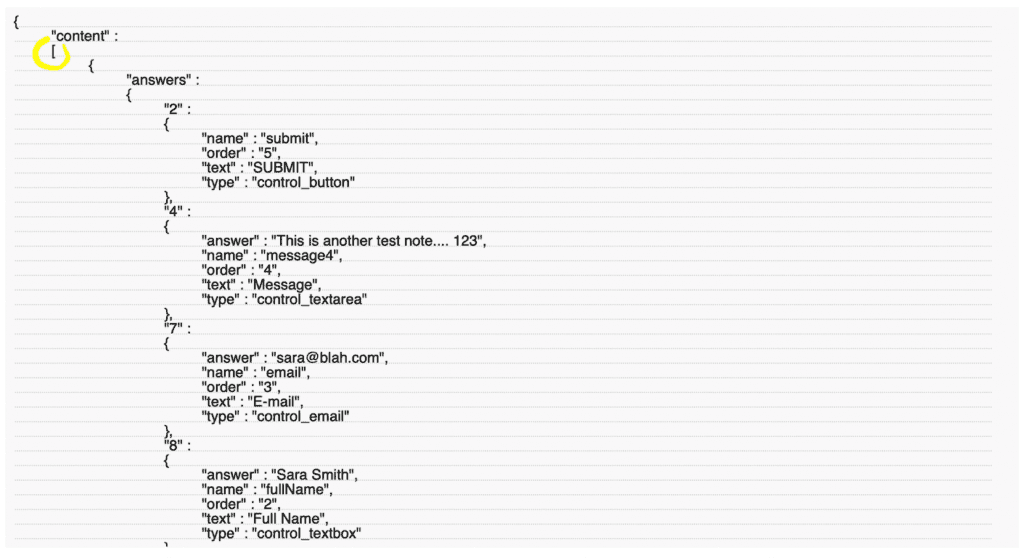
Notice the opening square bracket “[“ circled in yellow in our example? In JSON, anything wrapped in square brackets “[ ]” is considered an “array” or list of objects. This way you can have multiple JSON objects all on the same level, otherwise each subsequent JSON object needs to be nested within its parent object to be valid. Note: unlike FileMaker’s GetValue or other text arrays, JSON arrays utilize ZERO based indexes, meaning that the index of the first array item is NOT 1 but 0, the second item is NOT 2 but 1, and so on.
Ok so looking at our sample data, we want to grab the user submitted form answers and pass them into an appropriate field within FileMaker. Since JSON is essentially a hierarchy of JSON objects “{}”, looking at our data we see that the first “parent” key is the name “content”, and inside that there is an Array “[]” containing two “answer” objects. These answer objects represent the online submissions to our JotForm.
If we wanted to select the “This is another test note… 123” value from our sample JSON data, we could say something to the effect of “get me the answer value of the answers value named “4” of the answers object that is the first child of content”…. but that is kind of a mouth full and even then, is open to misinterpretation. So instead, in JSON we would simply say it like this: content[0].answers.4.answer
See the difference? Content is the parent JSON object in which everything else is nested within. It contains a JSON array with two JSON child objects each named “answers” the first of which has an index of 0 and the second a 1 respectively. Then within each child object we have a value named “4” whose value is another JSON object with several name value pairs, one of which is simply named “answer” and ITS value is the actual one we want! Having fun yet?
{
     content
		[
			answers
				 4
				    answer
			answers
				 4
				    answer
		]
}
Therefore, using our sample JSON data, here are the respective JSON paths for each of the following:
- Name = content[index].answers.8.answer
- Email = content[index].answers.7.answer
- Message = content[index].answers.4.answer
Simply enter the “index” for the particular form submission (ie either 0 or 1 in our example) within your square brackets “[]”, and you’re good to go!
Get Loopy
Now that we have our API results and know how to parse and select the JSON elements that we want, it is time to save our form values as records in our FileMaker file. To do this we can use a simple loop to cycle through all of the form submissions.
Essentially, we want to do the following:
- Get a count of the form submissions (or indexes) in our API results
- Start a loop
- Create a new FileMaker record and insert the desired values from the current index into their respective FileMaker fields
- Exit our loop once we have reached the last index
- Otherwise move on to the next index and repeat the loop
Here is what that could look like in FileMaker:

Above is just one of many possible options for creating a simple FileMaker script that can loop through sample JSON API results and parse the desired values into FileMaker. You could easily simplify this script further by combining or omitting several steps respectively, but we chose this particular example mainly for its illustrative (and hopefully) easy-to-follow steps.
If you made it this far, you should now have a functioning method for grabbing online JotForm submissions directly into your FileMaker database! Pretty neat huh?
Thank you so much for reading. Hopefully you found this post useful, and walked away with an understanding that JSON, cURL, and even APIs really aren’t that scary once you learn a little more about them. We talked about reasons to consider API integration with FileMaker, how to use FileMaker with an online form building service like JotForm. We walked through a simple JotForm API call using only an “Insert from URL” script step. Then we learned about JSON, what it is, how to use it, and went through a simple script to take our JotForm API results and seamlessly parse them into new FileMaker contact records! Finally, while this article is meant to be a beginner’s introduction to many of these topics, there is still a whole world of more complex (and challenging) APIs to work with should your interest be piqued, or the need arise. Happy integrating!
Read more
Subscribe to get the latest in your inbox.

Built with you in mind
Speak to one of our expert consultants about making sense of your data today. During
this free consultation, we'll address your questions, learn more about your business, and
make some immediate recommendations.