
WordPress is a well-known platform for creating custom websites. It looks like this platform has a ready-to-use plugin for anything – but this is not always the case. If you store all your data in a FileMaker database, there is no magic button that will connect these two platforms. For many, it means double entry and a lot of manual work that can be easily avoided. In this tutorial, we will look at how to work with FileMaker Data API and use it to connect FileMaker with WordPress through Gravity Forms.
First Steps to Connect WordPress and FileMaker
To start with, we will need a free app called Postman to test our first API calls. We will also want the FileMaker Data API documentation. Our goal for this tutorial is to create a new record in FileMaker every time a user fills out a form through Gravity Forms on our WordPress website. For this, we will need to add some custom code to the function.php file, located in your WordPress Theme Editor. But before we do that, let’s make a test call to FileMaker from Postman to see how it all works under the hood.
Enable API Access
First, we need to enable the fmrest extended privilege in our FileMaker file’s security settings. To do this, make sure you are logged into the file with a full access account, then go to Manage > Security. Under the Extended Privileges list, double click fmrest and mark it to be active for Full Access (or whichever privilege set you want to test with). This enables file access via the FileMaker Data API.
Get an Access Token
Before Postman can interact with the database, we also need to obtain an access token. Open Postman and make your first call to the FileMaker database by setting up the method to POST. Use the following format for your request: https://<<your server>>/fmi/data/v1/databases/<<your database>>/sessions
In order for this to work, you also need to add a header. Go to the Authorization Tab and choose Basic Auth in a dropdown menu. FileMaker uses a base64-encoded account name and password to log in to the hosted database. Press the preview request button to save your credentials in temporary headers and make a call. If you did everything right, you’ll see an access token, like in the picture below. This token is valid until you log out of a database session or for 15 minutes after the last API call.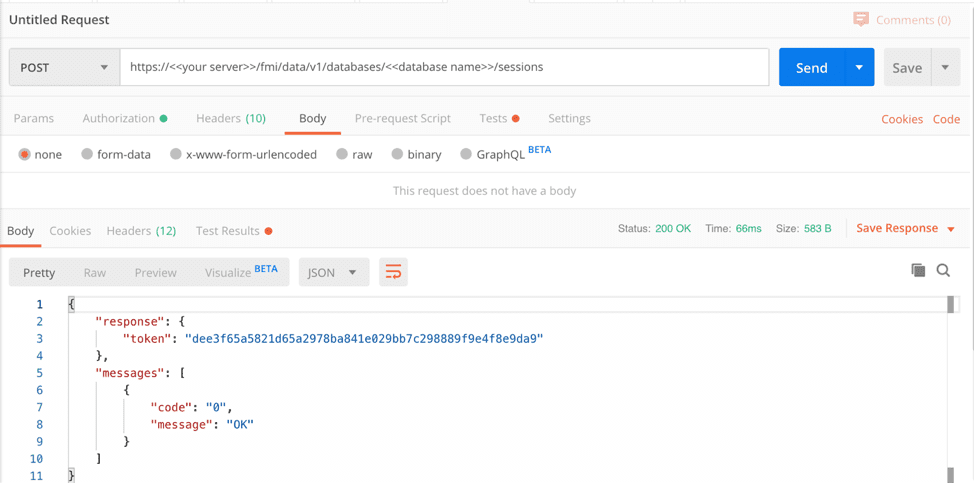
Create a Record
Once you have the token, you can start working with FileMaker data. Now, you can search, run FileMaker scripts, delete records, edit data, and more. We will use our token to create a new record. For the second call, the app will automatically save the token under Bearer Token Authorization. You will also need to add “Content-Type: application/json” to your header and use JSON format in the body of the request.
To create one record in a single table, specify “fieldData”, and if you want to add data to the portal, use “portalData” as shown in the code snippet below. If you work with two tables instead of one, make sure that on your relationship graph you can create records in the second table via this relationship. You can also create an empty record with default values by leaving the body of the “fieldData” empty. Make sure field names specified on the left match the field names in FileMaker.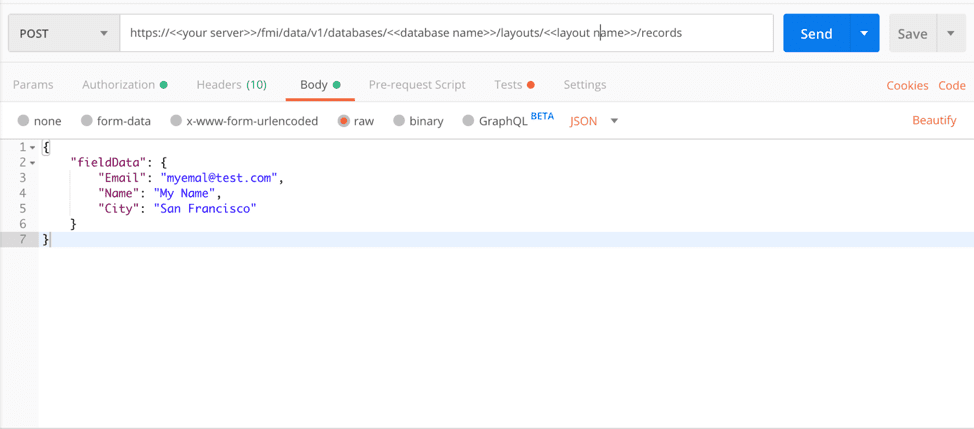 Use the following format: https://<<your server>>/fmi/data/v1/databases/<<database name>>/layouts/<<layout name>>/record
Let’s go to Postman and make another POST request. If you did everything right, you’ll see the ID of the newly created record in your response!
Add some code
Now that you know how to make calls to FileMaker via the FileMaker Data API, it’s time to add some code to your functions.php file. Don’t worry if you don’t know php – below, there is a fully functional piece of code that will help you to get started.
Both of our API calls will be inside the fm_data_api function. In the beginning, we will also add a hook to the form that will call our function every time the form is submitted. Each plugin has different syntax but for Gravity Forms you need to add this line to the code:
add_action( 'gform_after_submission', 'fm_data_api_form', 10, 2 );
Next, add your credentials and other information to the function below. Keep in mind that it’s better to use the underscore symbol or dash in between words to represent a space, or use CamelCase and omit spaces from your field names and layout names altogether.
In the first step, you will get an access token. If the response is “200 OK,” meaning you received a token without an error, you can then start to build the body of the request. The example below shows how to build complex JSON code in php using the form data. The numbers next to the entry variable mean the ID of the form field you are taking data from:
 When building your JSON, it is helpful to have a way to see the final result. In Gravity Forms, you can enable logging in the settings and use this line to print the values to logs:
GFCommon::log_debug( 'gform_after_submission: my_json IS => ' . print_r( $my_json, true ) );After you have made the call and created a record, you need to log out, close the session and check for errors. The full code can be found below.
function fm_data_api ($entry, $form ){

  // set variables

	$myServer = 'your server';

 	$myUser = 'user name';

	$myPass = 'user pass;

	$myFile = 'file name';

	$myLayout = 'layout name';
// set variables
$myServer = 'your server';
$myUser = 'user name';
$myPass = 'user pass;
$myFile = 'file name';
$myLayout = 'layout name';
  // Step 1: get access token

	$myEndpoint = 'fmi/data/v1/databases/' . $myFile . '/sessions';

	$post_url = $myServer . $myEndpoint;

	$headers = array('Authorization' => 'Basic '.base64_encode("$myUser:$myPass") , 'Content-Type' => 'application/json');

	$request = new WP_Http();

	$response = $request->request($post_url, array( 'method' => 'POST', 'headers' => $headers ));

		if($response){

    	//Step 2: parse a token from the response

    	$responseObj = json_decode($response['body'], false);

    	$responseCode = $responseObj->messages[0]->code;

	//add JSON body to your request using the data from the form

		if($responseCode == '0'){

      		$responseToken = $responseObj->response->token;

		//use the unserialize function for fields with multiple entries

		$multiEntries = unserialize( rgar( $entry, '5' ) );

		$form_array = array(

        	"Email"=> rgar( $entry, '1'),

			"FirstName"=> rgar ($entry, '2.3'),

			"LastName"=> rgar($entry, '2.6'),

        );

		$fin = array('fieldData'=>$form_array);

      	$my_json = json_encode($fin);

		//Optional: add new records to the portal from a field with multiple entries

		$portalData = [];

		for ($x = 0; $x < count($multiEntries); $x++) {

			array_push($portalData, array("table_name::field_name" => $multiEntries[$x][Line]));

		}

      }

		$secondData = array('multiLines'=>$portalData);

		$thirdData = array('portalData'=>$secondData);

		$sec_json = json_encode($thirdData);

		//Step 3: create final Json that combines field and portal data

		$together = json_encode(array_merge(json_decode($my_json, true),json_decode($sec_json, true)));

     	//Step 4: Second API call, create a record

      	$myEndpoint = 'fmi/data/v1/databases/' . $myFile . '/layouts/' . $myLayout . '/records';

      	$post_url = $myServer . $myEndpoint;

      	$headers = array('Authorization' => 'Bearer ' . $responseToken , 'Content-Type' => 'application/json');

      	$request = new WP_Http();

      	$response = $request->post( $post_url, array( 'method' => 'POST', 'body' => $together, 'headers' => $headers ) );

      // Step 5: log out after

      $myEndpoint = 'fmi/data/v1/databases/' . $myFile . '/sessions/' . $responseToken;

      $post_url = $myServer . $myEndpoint;

      $headers = array('Content-Length' => '0');

      $request = new WP_Http();

      $response = $request->post( $post_url, array( 'method' => 'DELETE', 'headers' => $headers ) );

	//add error checking here

		}

}
If you do everything right, you will see a new record created in FileMaker! In the same way, you can use the FileMaker Data API with other WordPress contact form plugins or for other purposes. The process of setting up a connection in the opposite direction will be different but since both platforms have REST APIs, the possibilities are virtually endless!
Subscribe to get the latest in your inbox.

Built with you in mind
Speak to one of our expert consultants about making sense of your data today. During
this free consultation, we'll address your questions, learn more about your business, and
make some immediate recommendations.